Getting started with Geodesic
Learn what Geodesic is and how you can start using it to simplify your local infrastructure development.
Intro
In the landscape of developing infrastructure, there are dozens of tools that we all need on our personal machines to do our jobs. In SweetOps, instead of having you install each tool individually, we use Docker to package all of these tools into one convenient image that you can use as your infrastructure automation toolbox. We call it Geodesic and we use it as our DevOps automation shell and as the base Docker image for all of our DevOps scripting / CI jobs.
In this tutorial, we’ll walk you through how to use Geodesic to execute an authenticated AWS CLI command and talk about what is going on under the hood.
Prerequisites
Requirements
To accomplish this tutorial, you’ll need to have an AWS Account handy and have Docker installed on your local machine. That’s all.
Docker Primer
Before we jump in, it’s important to note that Geodesic is built around some advanced features of Docker and the Docker CLI that are worth understanding. If you know the docker CLI well then feel free to skip over this section.
- Geodesic overrides the default entrypoint with a custom script that enables starting a login shell or installing geodesic as an executable on your local machine. If you don’t know much about Docker’s
ENTRYPOINTorCMDcapabilities then we recommend reading this article before moving forward. - Geodesic can be thought of as just another shell that you open up on your machine like
zshorbash, but when running it inside of Docker means that it doesn’t have access to your home directory or the projects you’re looking to work on. To get around that, Geodesic is typically run using Docker volume bind mounts via the--volume/-vflag. You’ll see this in our examples below, but if you would like to understand more about what is going on under the hood then we recommend reading up quickly on mounting local volumes viadocker run.
Geodesic Usage Patterns
Let’s talk about a few of the ways that one can run Geodesic. Our toolbox has been built to satisfy many use-cases, and each result in a different pattern of invocation:
- You can run standalone Geodesic as a standard docker container using
docker run. This enables you to get started quickly, avoid fiddling with configuration or run one-off commands using some of the built-in tools.- Example:
docker run -it --rm --volume $HOME:/localhost cloudposse/geodesic:latest-debian --loginopens a bash login shell (--loginis our DockerCMDhere; it’s actually just the arguments passed to thebashshell which is ourENTRYPOINT) in our Geodesic container. - Example:
docker run -it --rm --volume $HOME:/localhost cloudposse/geodesic:latest-debian -c "terraform version"executes theterraform versioncommand as a one off and outputs the result.
- Example:
- You can install Geodesic onto your local machine using what we call the docker-bash pattern (e.g.
docker run ... | bash). Similar to above, this enables a quickstart process but supports longer lived usage as it creates a callable script on your machine that enables reuse any time you want to start a shell.- Example:
docker run --rm cloudposse/geodesic:latest-debian | bash -s latest-debianinstalls/usr/local/bin/geodesicon your local machine which you can execute repeatedly via simply typinggeodesic. In this example, we’re pinning the script to use thecloudposse/geodesic:latest-debiandocker image, but we could also pin to our own image or to a specific version.
- Example:
- Lastly, you can build your own toolbox on top of Geodesic. This is what SweetOps generally recommends to practitioners. We do this when we want to provide additional packages or customization to our team while building on the foundation that geodesic provides. This is simple to do by using Geodesic as your base image (e.g.
FROM cloudposse/geodesic:latest-debian) in your ownDockerfile, adding your own DockerRUNcommands or overriding environment variables, and then building a new image that you distribute to your team. This is more advanced usage and we’ll cover how to do this in a future how-to article.
In this tutorial, we’ll be running Geodesic standalone using docker run to allow us to get up and running quickly.
Tutorial
1. Start the Geodesic Shell
First, at your terminal, let’s start up the Geodesic shell!
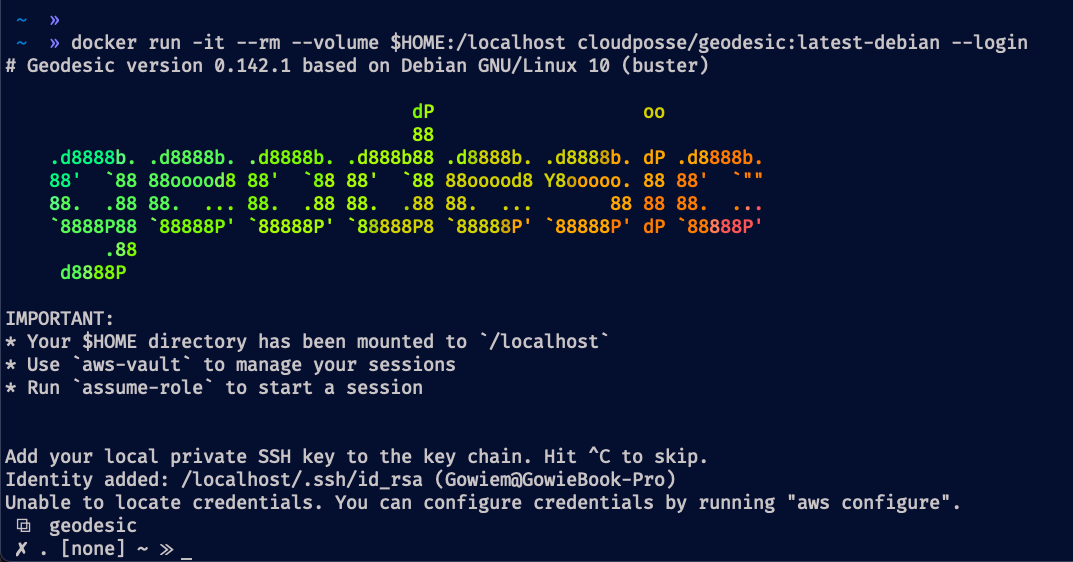
docker run -it --rm --volume $HOME:/localhost cloudposse/geodesic:latest-debian --login
There are a few things going on there, so let’s break that down a bit:
- We’re using
docker runto start a new container using the imagecloudposse/geodesic:latest-debianwhich is hosted on Docker Hub - We’re using the
-itflags (i.e.--interactiveand--tty) to start an interactive terminal session with a TTY. - We’re using the
--rmflag to ensure that we clean up this container after we exit out of the session. - We’re using the
--volumeflag to mount our$HOMEdirectory to/localhostin our new container. This is a Geodesic standard practice which enables the container and your corresponding shell session to have access to your dotfiles, configurations, and the projects that you’ll work on.- NOTE: If you’re running on Linux and using Geodesic, any files written to the
--volumemounts will be owned by the user inside the container, which isroot. See here for potential workarounds.
- NOTE: If you’re running on Linux and using Geodesic, any files written to the
- Finally, after the image name, we’re passing
--login. This is the DockerCMDthat we’re passing to our image. Since we override the DockerENTRYPOINTwith a small bash script, our--loginCMDresults in calling/bin/bash --loginwhich creates a new bash login shell.
The result of running this command should look like this:
2. Authenticate with AWS + aws-vault
Great – we’ve started up Geodesic so now we need to authenticate with AWS. To accomplish this, Geodesic ships with aws-vault to help manage our credentials and retrieve access tokens from AWS to provide us with authenticated sessions. To set up a new profile, first create a new IAM user and programmatic Access Key ID and Secret Key and be sure to copy those values down somewhere. Now, in your Geodesic shell, let’s do the following:
# Since our Geodesic on linux, let's set the default backend to an encrypted file instead of our keyring
export AWS_VAULT_BACKEND=file

# Add our new credentials to aws-vault. This will prompt you for the Access Key ID and Secret Key that you copied down earlier, which you should input.
aws-vault add luke.skywalker
Now we’ve added our credentials to aws-vault and we can easily use aws-vault exec to execute an authenticated command on the AWS CLI like so:
# List all the buckets in your account:
aws-vault exec luke.skywalker -- aws s3 ls

# Or get some information on your user:
aws-vault exec luke.skywalker -- aws sts get-caller-identity
3. Start a AWS Profile Session
That’s cool… but what about if you want to start a full blown session as our luke.skywalker profile? Well, Geodesic comes bundled with a handy assume-role utility that you can use to do that:
# This sets up your AWS configuration file so that `assume-role` will work properly. This is a one time setup process for new aws-vault enabled profiles.
crudini --set --inplace $AWS_CONFIG_FILE "profile luke.skywalker" "credential_process" "aws-vault exec luke.skywalker --json"

# Now we run `assume-role` with our newly created profile and this will start a new shell session which is authenticated as that profile for us.
assume-role luke.skywalker

# Finally, we can run our AWS CLI commands without having to manually invoke `aws-vault exec` each time
aws s3 ls
aws sts get-caller-identity

The beautiful thing about all of this is that we didn't need to install anything except Docker on our local machine to make this happen. Both the AWS CLI and `aws-vault` tools involve specific installation instructions to get up and running, but by using Geodesic we're able to quickly skip over all of that and use a container that includes them out of the box alongside dozens of other tools as well. That is why we call it our toolbox as it enables consistent usage of CLI tools across your entire organization!